This review page is supported in part by the sponsors whose ad banners are displayed below |
 |
 |
|
 |
Presenter: Nelson Pass
All schematics and plots: By Nelson Pass
Supplemental photos: From the DIY Audio thread Burning Amp Tweets
|
 |
The Burning Amp Festival is a DIY audio event that's been held in San Francisco in October for the past few years. This is a loose transcription of Nelson Pass talking without notes but with pictures. It was edited for clarity and brevity and to make Pass sound more articulate than he really is. We open with a smattering of applause:
|
 |
Okay, well once again, as always what we do here is ... uh, that I string a bunch of pictures together
and then talk about each one. And the subject of this talk is the FirstWatt F6 design which those of you who hang out on the forums at DIY Audio know... (loud brown note from the PA system. "Too much feedback!" Audience laughter at clumsy microphone manipulations)...
Okay! The F6 is a project where I looked around for something to do and saw that we already had an F5 and I did want to do something a little different. What drives this design are a couple of things. One is that I wanted to do more with these power Jfets, the ones that are no longer made, the bad news being that SemiSouth apparently has closed its doors. The only thing I can say is that I bought a big pile of them and so have every intention of marching ahead. Also I wanted to do a little more work with audio transformers. I announced the F6 on the Pass forum at DIYAudio with a little teaser schematic of what I had in mind:
|
|
|
 |
| Actually, I originally put up an erroneous version of this schematic but the corrected version you see is a push-pull Class A power Jfet amplifier. The power Jfets I have are only available as N-channel versions. There aren't any complementary P-channel parts. We thus don't have the ease of operating them in push-pull stages as we get with complementary parts so usually some kind of accommodation has to be made to get push-pull operation. |
|
|
A lot of amplifiers use what is known as quasi complementary, stuff that dates back to RCA, the Harmon Kardon Citation 12, Phase Linear and other things that came out of the late '60s. They inevitably involve some additional circuitry that allows the device on the negative side to behave as if it were a P-channel part. |
|
|
|
 |
Even when you have P-channel parts, there's some flaw because really nobody makes truly symmetrical Ps and Ns. That hasn't stopped anybody—it certainly hasn't stopped me—but I found an opportunity here to maybe play around a little bit using a transformer similar to the one I used in the M2 amplifier where the transformer produced all of the voltage gain. In the M2 I drove the primary of the transformer and the secondaries had more windings on them so that all your voltage gain could be generated by that. Then a complementary output stage with a pair of N- and P-channel Mosfet power transistors as voltage followers and voilà: you've got a single-stage amplifier with no feedback. It's a nice little amplifier and I am still selling them.
But as I said, I wanted to so something a little different and still had some stock of the transformers I had been playing with. So I decided first off to build an amplifier which was push-pull complementary but with only N-channel devices and really good decent symmetry between the plus and minus halves. One way to achieve that was how they used to do it back in the old days - with transformers. And like I said, I had some laying around.
|
|
|
Looking at the above schematic, the primary winding drives two secondary windings with a 1:1 ratio. The top transistor Q1 is driven in phase and the bottom negative transistor Q2 is driven out of phase using only N-channel devices with good symmetry and biased into Class A. You can build this amplifier as presented. Finding this particular transformer is kind of a rarity so you look through the catalogues and most of what you find are two primaries and two secondaries. That's okay, we'll adapt to that.
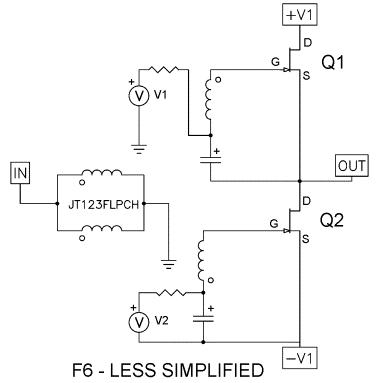
The little circles with a 'V' in them are voltage sources. The Fets we use have to be given positive Gate voltages relative to the Source pins (note the S for Source, G for Gate and D for Drain on the transistors). We put a little positive voltage on these things to get them to turn on. In this case about 1.2 volts will get them running. You have to provide that 1.2 volts and in this circuit I have specified voltage sources. In each case the voltage source is relative to the Source pin of the device. You bias the Fets up at about 1.2 volts and you have an actual amplifier. There is a small problem though. The Jfets would have to be perfectly matched and all the other conditions would have to be equal too because there's nothing here to control the DC offset voltage at the output. It might be free to drift around a bit. Here is the less simplified version: |
|
It shows a real part, a Jensen JT-123flpch, a nice little $30 transformer which mounts on the PCB and has four windings which are all identical. In case you don't know this about transformers, the little dots indicate the polarity of the windings so if I put a positive voltage on the dotted end of one winding, a positive voltage will appear on the other dotted end of the other windings. The primaries are running in parallel. Of the two output windings, the one driving the negative transistor Q2 is flipped in polarity. When a positive voltage appears at the input, a positive occurs at the Gate of the positive transistor Q1 and the output will follow that. A negative appears at the Gate of the negative transistor Q2 causing it to carry less current, supporting the positive output of Q1. And that's a push-pull circuit.
There are a couple of other differences. Instead of referencing the bias voltage to the Source of the output transistor Q1 as in the previous circuit, I now reference it to Ground. This solves the DC offset problem I mentioned. The transistors don't have to be perfectly matched and you don't have to tweak them so that the temperature is always the same and so on. As the output DC starts to drift, this will drive that transistor in such a way as to compensate. Now we have a circuit where the voltage V2 determines the bias current of the amplifier and V1 determines the output DC offset and both are independently adjustable. A little bit later you will see that we put in potentiometers to do that. You can use anything to make the bias voltages – you can use a battery, in fact a 1.5V battery is just about the right voltage for that. I did build exactly this circuit and the distortion curve looks like this:
|
|
This is a 'no-feedback' circuit. Down around a 10th of a watt it has 0.1% distortion, mostly second harmonic because the two transistors are not perfectly matched. As you can see, up at 5 watts it's running about 1%. That's fairly respectable as compared to 'no-feedback' single-ended triode (SET) amplifiers.
|
|
|
This performance is open-loop—no loop feedback—and the output impedance of the amplifier is high. I's a current source amplifier with a very small damping factor. It works fine. You can listen to it and blood won't come out of your ears. There are many speakers that will probably not appreciate this performance but there are some that will sound quite good. |
|
Here's that same circuit but now I've done something new. I've put a feedback loop in it and I'm using the primary of the transformer as the feedback element. When I input a positive signal, the upper secondary drives the positive transistor Q1 to produce positive output. The other secondary drives the negative transistor Q2 oppositely also producing a positive output. This amplified output comes back to the primary windings through the feedback loop where a resistive divider delivers the positive voltage at the minus side on the input coils of the transformer. This reduces the amount of gain, provides a damping factor for the amplifier, lowers the distortion and raises the input impedance of the amplifier.
So we've morphed from a more simple transformer with no feedback driving a not very DC-stable output stage into something where we have some DC control and can set the gain with feedback and lower the distortion and so on. The open-loop figure I was getting for the previous circuit with no feedback was about 38dB of gain with a frequency response that rolled off at about 5kHz or so. With feedback the gain is 15dB with a bandwidth of 50kHz.
Now for a little more detail on how those bias voltages get developed. Resistors bleed a small amount of current through LED1 and LED2. I used blue LEDs which develop about 2.7 volts. I need about 1.2 volts bias so I put in potentiometer dividers P1 and P2 for adjustment. This result goes through the 10KΩ resistors R4 and R5 to the drive coils which pass the bias voltage to the Gates of the transistors. The 1.2 volts or so biases the amplifier at about 1.5 amps for Class A operation. To see to it that the secondary still presents a low AC source impedance to the Gate of the transistor, we couple it to the Source pin through the large-value capacitors C1 and C2. As a result when we turn the amp on, it takes a little while for them charge up before the amp gets going.
|
 |
 |
 |